Make Plaster Decorations From Scratch - Pumpkins - Holiday Craft DIY
Merhaba Sevgili Ziyaretçilerimiz;
NetBufe.Com Kazanç amacıyla kurulmamış ve ücretsiz yararlanılan bir sitedir. Video içeriklerinde yer alan reklamlar ile NetBufe.Com sitesinin hiçbir menfaat bağlantısı söz konusu olmayıp ilgili reklamlar videonun yüklü olduğu siteler tarafından veya videoların yüklü olduğu sitelere yüklemeyi yapan kişilerce eklenmiş reklamlardan ibarettir.
Videoların paylaşıma açıldığı sitelerde yüklü videolar/video linkleri herhangi bir nedenle kaldırıldığında ve/veya kısıtlandığında/yasaklandığında sitemizde de ilgili videonun gösterimi otomatik olarak son bulmaktadır.
Telif Hakkı(Copyright Notice) Olabilecek Açık Kullanım İzni Verilmemiş Video Materyaller Hakkında Önerimiz İlgili Videoyu İzlemeyerek(Bu Yönde Materyallerin İzlenmesine Destek Vermeyerek), Resmi Olarak Satın Alıp İzlemeniz Yönündedir.
Tarafımızdan Üyelerimizin sayfamız üzerinde ayrıntılı olarak yer alan tüm bu durumlara ilişkin bilgi ve gerekleri okuyup anladıkları ve kabul ettikleri varsayılmaktadır.
Sitemize ücretsiz ve kolayca üye olarak birçok video paylaşım sitelerindeki kendi videolarınızın linklerini ekleyebilir, Sık Kullanılanlar ve Çalma Listelerinize kaydedebilir ve üye olmanın diğer tüm ayrıcalıklarından üye sosyal alanınızda yararlanabilirsiniz. Video Linkleri Ekleyebileceğiniz Örnek Bazı Siteler
NetBufe.COM
Açıklama
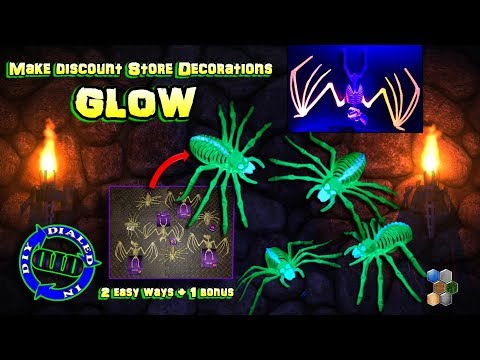
Great craft project, easy to do, fun in groups or as a solo project AND can become great gift ideas for holidays or anytime! This is a complete tutorial that teaches how to take a single decoration or item and turn it into as many copies as you want at very little cost. The key is the choice of original item and in this video I used plastic Halloween pumpkins from the Dollar Store as my example but the same technique works for so many more things too. This is truly a “Dialed In” DIY project because you can start and finish with a basic duplication or you can continue dialing in with more detailed painting, optional carving, unique & creative enhancements, as well as multiple uses for your completed item (all of which are demonstrated and explained in the video also). I used my new pumpkins for more of the typically themed purpose, lit up for Halloween decorations (i.e. candle holder, LED lighting, glow stick holder even a candy holder – Mentos) but they can also be great standalone decorations on a table or shelf, paper weights, pen/pencil holders, gifts, painted with messages and so much more.
Additional Halloween Themed Video Links:
1. Selfie King of the Living Dead Decoration: https://youtu.be/Okg_bMKgYRg
2. Make Glowing Decorations - Glowing Pumpkins for Halloween: https://youtu.be/OySPy3Q0vqQ
3. Haunted Camera - Spooky DIY Prop design: https://youtu.be/Ulbek7GyqwA
4. Pumpkin Flasher - aka making flashing pumpkins: https://youtu.be/4b3iyeofJIY
Plaster decorations from candy molds Video Link: https://youtu.be/AVCHPQm8ruw (Great Craft Project for the Holidays - Fun Family Activity)
Complete DIY tutorial! Materials used in this video:
• Plaster of Paris & water (bought at a hardware store) - (more about this below)
• Plastic Decorations (hollow, plastic pumpkins with texture on the inside)
• Craft knife
• Tape
• Vaseline
• Spray shellac (bought at a hardware store)
• Spray paint (bought at a hardware store)
• Water mixable oil paints (optional – from a craft store)
• Small drill bit (optional)
• ½” PVC (optional)
• LEDs (optional – from Dollar Store) – I used LED flickering tea lights, LED flashing toy
• Glow stick (optional)
• Candy (optional)
NOTE: If you want an even more professional look from your plaster (i.e. less chance of bubbles in the finish), then I recommend starting with your container of water and then slowly sifting the plaster into the water WITHOUT stirring. The 2 to 1 ratio will still be pretty accurate but your goal is to slowly add the plaster allowing it to absorb the water as it settles. Eventually the plaster will build up above the level of the water line. Once you no longer see clear, visible water on the surface stop adding plaster. This process minimizes having air mixed with the plaster and allows the plaster to sit much longer without setting. You can also tap or vibrate your bucket of plaster to help release any remaining air bubbles so that they do not end up in your casted item (i.e. surface blemishes). Fun fact: the setting rate of plaster (hardening) is directly related to how much it is mixed or stirred. The more you mix it the faster it will set. This is why sifting plaster into water without stirring allows you more time to work with the materials. Once you are ready to pour your plaster all you have to do is gently stir your plaster to ensure it is all mixed well and then pour carefully to minimize blending air into the plaster as it hits the mold. It will expand a little as the plaster turns from liquid to solid. I love making things with plaster because once it is dry it can be carved, drilled, sanded, cut, textured, repaired and more.
A word about drying times: Plaster sets pretty firm in about 30 – 45 minutes. Once it feels cool to the touch the mold can be removed to speed drying time. Plaster typically is fully cured in 2 to 3 days but depending upon conditions & size of object it can take 15 – 20 days to fully dry. Drying can be done in a day or two if you put items in front of a heat source (i.e. heat vent). I have even left items in a car trunk parked outside on a hot day and it worked
WARNINGS: 1. As plaster cures it produces heat (exothermic reaction). This heat is sufficient enough to cause burns if you have skin sitting in plaster as it cures. DO NOT use plaster to make an immersed mold of any body parts. 2. Keep a rinse bucket handy for cleaning off tools, etc. but do not use a sink for cleaning buckets & tools. Plaster can accumulate and harden in pipes which can result in some costly plumbing repairs. 3. According to the label on plaster it is not toxic but it is a very fine powder which can be an irritant so appropriate dust mask and other protective devices should be used.
Music: http://www.purple-planet.com